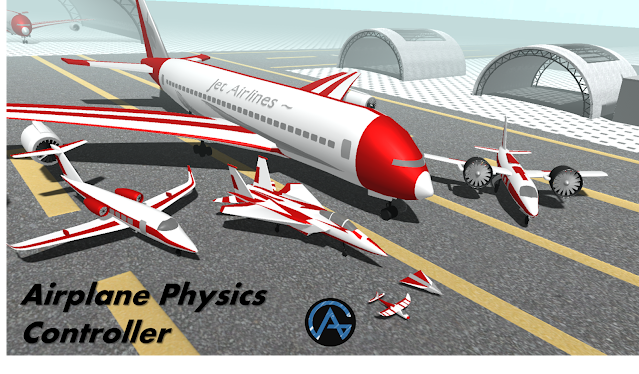
Airplane Physics Controller - Easy Physics Based Airplane - A powerful and realistic yet very simple to use AirPlane controller, Compatible with so many different kinds of Planes. From a paper plane or Toy Plane to Big Passanger Jets or Fighter Jets, this Controller can help you fly all those Aircrafts.
This Package uses easy controls for movement like Lift, pitch, roll and yaw and thrust etc.
This package is suitable for GTA style games or Airplane racing, Stunt games, Jet Fight / War Games or Simulation games etc.
This Package uses easy controls for movement like Lift, pitch, roll and yaw and thrust etc.
This package is suitable for GTA style games or Airplane racing, Stunt games, Jet Fight / War Games or Simulation games etc.
Check Out my other products - Helicopter Physics Controller, Simple Drone
1. Key Features
- Unity Physics based Airplane Physics Controller that can fly wide range of Aircrafts, without changing the script itself.
- Procedurally Animated Airplane parts like Propellers, Rudders and Flaps etc. which is fully customizable even at runtime.
- Easily customizable from inspector, You can make different kinds of aircraft fly with this package like Big Passenger Aircrafts, Small Aircrafts, Fighter Jets, Paper Plane or Toy Plane and even Vertical Take Off Plane.
- 6 Different Airplane Models included - Big Passenger Aircrafts, Small Jet Plane, Fighter Jet Plane, Paper Planes, Toy Plane and Vertical Take-off Planes in 6 different Demo Scenes ready to fly.
- 2 Cine Machine Camera Setup provided for different Camera View Type
- Follow Camera – Behind the Airplane
- Free Look Camera
- Works great with unity version 2020.1.1f1 and later but it should also work with previous versions, even with unity 2018 version as this package is not using any specific feature of 2020.1.1f1 (C# Based).
- Documentation Provided for Easy Setup of new Airplane within 5 minutes.
1.2 Some Other Features
- Auto Stabilization for Planes (Kind of Auto Pilot) and Auto Rotation.
- Automatically calculates Wing Area and Coefficient of Lift etc.
- Engine Rotation while flying for Vertical Take Off Capable Planes.
- Airport Environment Scene
2. Pre Setup
This Package needs
Cine Machine for Camera, to work properly So, if you want to use Cine Machine
skip step 1 otherwise skip step 2
1. If you have your Camera Setup, then Just delete Cine Machine Camera Controller
Script from script folder after package import.
1. Delete CM vcam1 and CM FreeLook1 Game Object from all Demo Scenes.2. And setup Main Camera as you want.
2. Import Cine Machine
Import Cine Machine to your Project, unity would import Cine Machine before this package import if you allow to import package manager dependencies when importing package, but if you didn’t allow (there would be some errors as there is a Script on Camera that uses Cine Machine) then you can import it later via Package Manager (steps are same as you import any other packages from package manager).
3. How to Setup New Airplane
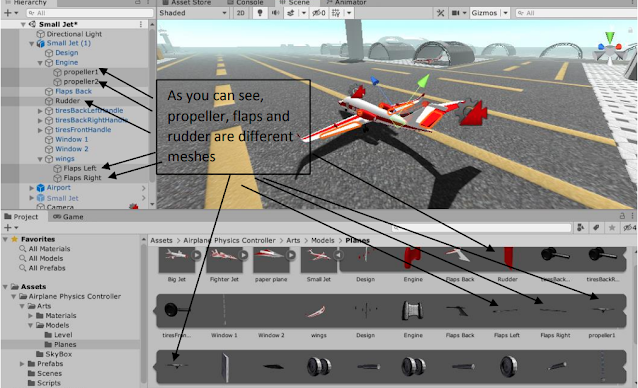
1. Import Your Helicopter Model in unity, and make sure that Helicopters main body and
rotating parts like propellers, rudders, flaps are separate meshes. Make sure to check
Read/Write Enabled in import Settings (necessary for automatic calculation of Wing Area).
And Also make sure that your plane models Z Axis should be along Plane’s forward direction
(required for wheel colliders to work properly)
2. While importing, make sure that rotation of rotating parts like Propellers, Flaps, Rudders etc. is 0 about all axis, initially. E.g.,
Note - If rotation angles are not zero, then just make empty child of rotating part, now make this child parent of rotating part, then rotation will become zero.
3. Attach
mesh collider to all necessary mesh parts of Planes and make them Convex (try
to avoid too much overlapping of colliders - For example when you attach
collider to wings it also covers flaps, so no need to additionally add
colliders to flaps).
4. Attach
PlaneControl Script to Airplane Game Object, PlaneControl script will
automatically add Rigid body and AirplanePhysics Script to Airplane Game
Object.
5. Set
Rigid Body mass = 6500 (For Default Case – Small Jet Planes), Drag = 1,
Angular Drag = 5 and leave other Rigid Body settings as it is.
6. Add
an empty Game Object as children of Airplane Game Object (Name it as –
Surface Check Point or anything you like –it’s transform will be used to
check whether plane is on ground). Make sure that no colliders come in way
of this transform to down direction.
Now Drag Surface Check Point
Transform to Airplane Physics Script Input Field in Inspector and set Ground
Distance variable (distance of this transform to ground).

7. Add Wings Mesh Transform (Which has Mesh Filter Component) in Airplane Physics Script field for Wing Area Calculation.
8. Note - Default Airplane Physics Script values is appropriate for Default Case (Jets Planes Like in this example), or you can Tweak values according to your Plane.
9. Give
input to Part Controllers by Dragging Rotating Parts (i.e., Propellers,
Flaps and Rudder) to Parts Controller Input Field in Inspector and give
value to rotation speed field (higher value – higher rotation speed) and
Max Rotation Angle (For Flaps and Rudders etc.).
Propellers – Drag here all propellersSingles – Drag here rudderDuals – Drag here Flaps or Ailerons and ElevatorsMoving Parts – For Vertical Take-Off and Landing Plane - Drag Here Engine Mesh Transform (Not useful for this example)
10. Now
Give values to Rotation Axis Field in Part Controllers Script Inspector
e.g., For Propellers check that about which axis rotors rotates correctly, in my case, propellers rotors rotate correctly about Y Axis.
e.g., For Propellers check that about which axis rotors rotates correctly, in my case, propellers rotors rotate correctly about Y Axis.
So, I am giving Value (0, 1, 0) in Rotation
Axis Field for propeller (1 - for rotation and 0 - for no rotation about their
respective Axis).
Do Same for all other rotating parts i.e., for Flaps and
Rudders etc.
E.g., Propellers Settings
E.g., Propellers Settings

E.g.,
Rudders and Flaps Settings

11. If your Plane has wheels then add Wheels Script to Airplane Game Object. Add wheel models and wheel colliders to their respective field in Wheels script (Make Sure Wheel Colliders and Wheel Models is separate transforms). Tick which wheel is steering wheel (usually front wheel) and which wheel is motor wheel. E.g.,
12. If you are using Cine Machine, then Drag Your Helicopter Game Object to Follow and Look-At Field of CM vcam1 and CM FreeLook1.
That’s it now Press Play Mode and Fly your Plane……
That’s it now Press Play Mode and Fly your Plane……
4. Some Extra Settings in Airplane Physics Script
1. Auto Stabilization (Kind of Auto Pilot – Can
Stabilize Unstable Plane and Fly in straight Direction, Not AI) – Tick It for
using this feature.2. Auto Stabilization Angle – Greater the
Value, Faster the Plane Stabilizes.
3. Auto Rotation (YawWhenRollAngle Variable) -
Rotates plane about its Y Axis when rolling (Greater the Value, Greater Would Be
Auto Rotation)4. CanPlaneHover – Tick It (For Vertical Take Off
Plane) (Controls – Num 2 and Num 8).
5. Default Controls
To be Set in Input Manager (Keyboard Controls)
Horizontal – A, D (Yaw Controls)
Vertical – W, S (Thrust Controls), Also Works for Wheels
when on ground
Horizontal1 – left, right (Roll Controls)
Vertical1 – up, down (Pitch Controls)
Hover - Number 8, 2 (For Engine Rotation - Vertical Take Off
Plane)
TAB Key Press – To Change Camera View
6. For Support - Contact Us
Glad to know that you are interesting in using our package. I hope this documentation helped you in using this package.
But still, if you have any further questions or have any suggestion about improving Asset, Contact us.
Show your support by giving a nice review for asset.
Download Demo - Zip File


Comments
Post a Comment