Helicopter Physics Controller
Easy Helicopter Physics System or Helicopter Controller. It comes with 3 different premade Helicopters models, just drag one of helicopter prefab in scene and ready to go.
ChangeLog (vEr 1.1.0)
- Improved Physics Control System with better and More Flexible Automatic Stabilization Control
- Added Engine On/Off System
- Improved Landing and Take Off System
- Better Looking Helicopter 3d Model (Big Helicopter 1 and Previous 3d model also included)
- Added Drone Model with Demo Scene (Propeller Based)
- Updated Project to Unity's new Input System (Includes Keyboard Controller, Mobile Controller, Gamepad Controller e.g., X Box Controller). Still supports Input Manager Controls (includes only Keyboard Controller).
- Code Optimization
- Now Helicopter Physics Script can work without part controller script (useful in case of non-propeller based drone etc.)
- FPS Camera System Added
Contents (vEr 1.1.0)
1. Main Features of Helicopter Physics Controller
2. Pre Setup
3. How to Setup New Helicopter
4. Default Controls
5. For Support - Contact Me
I tried to make this package as simple as possible but Yet gives near to realistic results, so You can make your helicopter fly with a very few steps.
A Single Scripts that handles all Helicopter Physics with proper comments for easy editing or modification. So you can easily understand and start customize script for adding new feature.
This Package uses easy controls for movement like pitch, roll and yaw. Helicopter is physic based which mean Lift applied to helicopter is also used for forward velocity or in any other direction when you rotate your helicopter, though there is additional Forward Thrust Option available for better speed control.
This package is suitable for GTA style games or Helicopter racing, Stunt games, Helicopter Fight / War Games or Simulation games etc.
1. Main Features of Helicopter Physics Controller
- Single Scripts that handles all Helicopter Physics with proper comments for easy editing or modification.
- Procedurally Animated Helicopter parts like Main rotor and tail rotor that is fully customizable even at runtime.
- Fully customizable from the inspector for creating different types of helicopter.
- You can make different kinds of helicopter fly, like Big heavy Monsters or flying birds and Small Remote Controlled helicopter toys or Drones etc.
- 4 Different type of helicopter models and 1 Drone model – 3 big helicopters, 1 small RC Helicopter and 1 Propeller Based Drone. Five sample scenes are included for testing all Four Helicopters (3 different helicopter Type with Keyboard and Gamepad control and 1 helicopter type with mobile control) and One Drone (Keyboard and Gamepad Controller).
- 3 Cine Machine Camera
- Follow Camera – Behind the Helicopter (Third Person View)
- Follow Camera – In Front of Helicopter (First Person View)
- Free Look Camera (Third Person View)
- Works on both Desktop and Mobile Platforms (highly Optimized).
- Comes with Unity's New Input System (Keyboard Controller, Mobile Controller, Gamepad Controller e.g., X Box Controller), But if you prefer Input Manager – We have it ready (only Keyboard Controller).
- Works great with unity version 2020.1.1f1 and later but it should also work with previous versions, even with unity 2018 version as this package is not using any specific feature of 2020.1.1f1 (C# Based).
- Documentation Provided for Easy Setup of new Helicopter within 5 minutes.
2. Pre Setup
2.1 Cinemachine Setup
This Package needs Cine Machine for Camera, to work properly So, if you want to use Cine Machine skip step 1 otherwise skip step 2
- If you have your Camera Setup, then
- Just delete Cine Machine Camera Controller Script from script folder after package import.
- Delete CM vcam1 and CM FreeLook1 Game Object from all Demo Scenes.
- And setup Main Camera as you want.
- Import Cine Machine
- Import Cine Machine to your Project, unity would import Cine Machine before this package import if you allow to import package manager dependencies when importing package, but if you didn’t allow (there would be some errors as there is a Script on Camera that uses Cine Machine) then you can import it later via Package Manager (steps are same as you import other packages from package manager).
2.2 Input System Setup
This package comes with both Input System and Input Manager, by default it uses new Input System (Keyboard Controller, Mobile Controller, Gamepad Controller e.g., X Box Controller), But if you want to use Input Manager, you can do so (Only Keyboard Controller).
- If you want to use Input system, then allow to import Input System Package when Unity Asks while importing this package. Or you can letter import it via Package Manager.
- If you want to use Input Manager, then don’t allow to import Input System Package, or letter remove Input System Package from project or just change to Input Manager in Player Settings. Now Extract files form Zip File named “Package with Input Manager”, and Replace Extracted Files/Folders in their respective directories.
3. Setup for New Helicopter
- Import your Helicopter Model in unity, and make sure that Helicopters main body and rotating parts are separate meshes.
- While importing, make sure that rotating parts like rotors rotation is 0 initially.
- Attach mesh collider to all mesh parts of helicopter (try to avoid overlapping colliders).
- Make this Mesh Collider Convex as, we will add Rigid Body on this transform later and non-convex mess doesn’t work with Rigid Body.
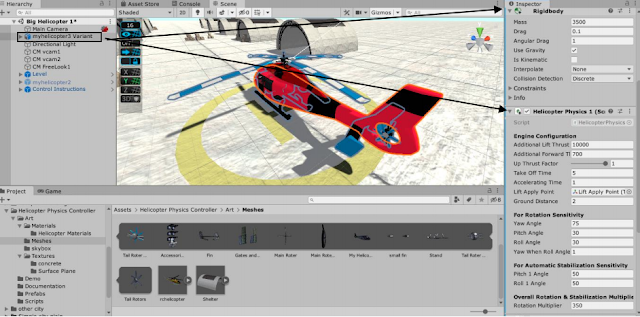
- Attach HelicopterPhysics1 Script to Helicopter Game Object, HelicopterPhysics1 script will automatically add Rigid body to helicopter Game Object.
- Set Rigid Body mass = 3500 (For Default Case – Big heavy Helicopter), Drag = 0.1, Angular Drag = 1 and leave other Rigid Body settings as it is.
- Add an empty Game Object as children of Helicopter Game Object (Name it as – Lift Apply Point or anything you like –it’s transform will be used as Centre of mass Body and all forces and torque will be applied on this transform). Now Drag Lift Apply Point Transform to Helicopter Physics1 Script Input Field in Inspector.
- Default HelicopterPhysics1 Script values is appropriate for Default Case, or you can Tweak values according to your helicopter. Note – If you are migrating from version 1.0 then, Automatic Stabilization Angle is changed with separate Pitch 1 Angle and Roll 1 Angle for more flexibility, so if you want stabilization behaviour as Version 1.0, just put same value as Automatic Stabilization Field Input (from version 1.0) in Pitch 1 Angle and Roll 1 Angle.
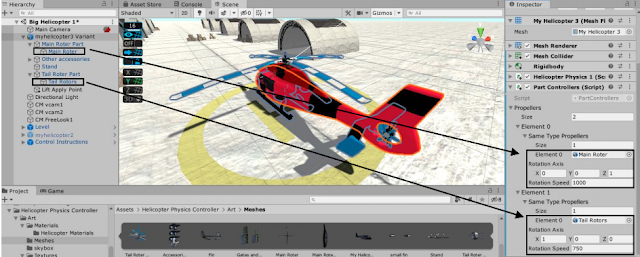
- Add Part Controller Script if aircraft is propeller based, And Give input to Part Controllers Script by Dragging Rotating Parts (i.e., Main Rotors and Tail Rotors) to Parts Controller Input Field in Inspector and give value to rotation speed field (higher value – higher rotation speed).
Note - If your all Propellers rotates correctly along same axis and you are giving same rotation speed, then Use Propeller Size = 1 and Same Type Propeller size = 2
Otherwise, use two different propellers type i.e., size = 2
Like in below screenshot, I am using to different rotation speed that’s why 2 different propellers type.
aNow Give values to Rotation Axis Field in Part Controllers Script Inspector
e.g., For Main Rotors check that about which axis rotors rotates correctly, in my case, main rotors rotate correctly about Z Axis.
So, I am giving Value (0, 0, 1) in Rotation Axis Field for Main Rotors (1 - for rotation and 0 - for no rotation about their respective Axis).
Do Same for Tail Rotors
- If you are using Cine Machine, then Drag
Your Helicopter Game Object to Follow and Look-At Field of CM vcam1 and CM FreeLook1.
Note – For CM vcam2, leave empty - Look At Field
That’s it now press Play Mode and Fly your Helicopter……
4. Default Controls
To be Set in Input Manager (Keyboard Controls)
Engine On/Off – Space (Turn on or Off Engine) Horizontal – A, D (Yaw Controls – Rotation about Z Axis) Vertical – W, S (Lift Controls) Roll – Left, Right (Roll Controls – Rightward or Leftward Rotation) Pitch – Up, Down (Pitch Controls – Forward or Backward Rotation) Stabilize Helicopter – (Reduces forward velocity) - Left Shift Tab Key – To change Camera typeFor Input System, you don’t need to change any settings, it works out of the box for Keyboard and Gamepad Controllers, but want to use Mobile Controller, Just Drag Mobile Controller Prefab from “Prefabs/UI” Folder in Hierarchy under “Canvas – Controls” Gameobject.
- Default Controls for Keyboard is Same as of Input Manager
- Gamepad Controller Mapping is as Follows
5. For Support - Contact Me
Website - tryCodeWithMe.blogspot.com
This is my First upload to Asset Store, So please Give me your precious Feedback….. :}
Link to asset Store Package - Helicopter Physics Controller | Physics | Unity Asset Store
Download Demo - Zip File (vEr 1.0)


Comments
Post a Comment